Step 1: Install Required Libraries
You will need captcha for generating CAPTCHA images, and pytesseract (OCR tool) to read the text from the images.
Install them via pip:
Step 2: Generate CAPTCHA Image Using ImageCaptcha
First, let's see how to generate a simple CAPTCHA image using the captcha library.
Example Code to Generate CAPTCHA:
Step 3: Read CAPTCHA Image Using OCR (pytesseract)
Now that you've generated a CAPTCHA image, you can use pytesseract to read the text from the image.
Example Code to Read CAPTCHA:
Read and Generate Image Captcha using Python
Pyhton code here..share your commetns
Extract the Content from the Website using BeautifulSoup library using Python
>>> import cowsay

>>> cowsay.cow('Hello World')
 ___________
| Hello World |
  ===========
           \
            \
              ^__^
              (oo)\_______
              (__)\       )\/\
                  ||----w |
                  ||     ||
>>> cowsay.cow('Lorem ipsum dolor sit amet, consectetur adipiscing elit. Mauris blandit rhoncus nibh. Mauris mi mauris, molestie vel metus sit amet, aliquam vulputate nibh.')Create Animal picture with 2 lines of code in Python
>>> from art import *
>>> tprint("Hello word")
>>> tprint("Hello world" ,font="random")

Create Art using Python with two line of code

1 .Which trigger type below starts a trigger based on an action, such as a button click on a form?
Window trigger
Process trigger
Interactive forms trigger
Email trigger
2.Which of the following are tasks performed by the Automation Co-Pilot Manager?
Deploys bots on remote devices
Creates teams and adds users to them
Manages processes and adds teams
Allocates Control Room resources
answer is:
Creates teams and adds users to them
3.In the process of setting up a widget, iframe widget configuration comes under which step?
Setting up Teams and Processes
Setting up the Widget
Creating an iframe
Configuring the Widget in web application
answer is:
Configuring the Widget in web application
4.Which of the following persona is assigned with the Unattended Bot Runner license?
Bot Creator
Automation Co-Pilot User
Automation Co-Pilot Administrator
Bot Runner
answer is:
Bot Runner
5.Which personas or roles below logs into Automation Co-Pilot Web, selects the process, and creates requests and tasks in the workflow?
Automation Co-Pilot User
Automation Co-Pilot Administrator
Automation Co-Pilot Scheduler
Bot Creator
answer is:
Automation Co-Pilot User
6.Select three of the benefits of Automation Co-Pilot from the following.
Enhances productivity
Can be accessed from limited number of applications
Quickly creates and deploys the bots
Simplifies the automation process
Insecure and lightweight
answers are:
Enhances productivity
Quickly creates and deploys the bots
Simplifies the automation process
7.Nyika, who is a Customer Relationship Manager, is on a call with the customer to resolve a payment issue. To fetch a few payment details, she switches between multiple disjoint applications which is formidable while the customer awaits. Can Automation Co-Pilot help her in simplifying the task?
Yes
No
answer is:
Yes
8.The Automation Co-Pilot Manager requires which of the following roles? Select all that apply.
AAE_Basic
AAE_Robotic Interface Manager
AAE_Robotic Interface Administrator
AAE_Pool Administrator
answers are:
AAE_Robotic Interface Manager
AAE_Robotic Interface Administrator
9.Which of the following is the responsibility of the Bot Creator? Select all that apply.
Designs the bots, forms, and process required for automation
Assigns roles and licenses
Checks items into the public folder so they are available to Automation Co-Pilot users
Creates separate teams for each department
answers are:
Designs the bots, forms, and process required for automation
Checks items into the public folder so they are available to Automation Co-Pilot users
10.Which of the following does not come under the tasks for setting up Back-Office automation?
Create teams with all the available members.
Design the process that specifies start and end points, as well as how forms, bots, and other components will be utilized.
Create the required team(s) with users and roles, and assign them to a process that has a unique process key.
Create and run an unattended bot to trigger the process.
answer is:
Create teams with all the available members.
11.Which of the following are stated Roles in the process of setting up Automation Co-Pilot? Select all that apply.
Device Management Role
Automation Co-Pilot Web Role
Check-In Role
Device Pool Scheduler Role
AAE_Locker Admin Role
Automation Co-Pilot User Role
answers are:
Automation Co-Pilot Web Role
Automation Co-Pilot User Role
12.The Bot Creator user requires which of the following roles? Select all that apply.
AAE_Pool Admin
AAE_Admin
AAE_Basic
AAE_Robotic Interface Manager
answers are:
AAE_Admin
AAE_Basic
13.Of the following roles, which should be assigned the Automation Co-Pilot User license? Select all that apply.
Automation Co-Pilot User
Automation Co-Pilot Administrator
Automation Co-Pilot Manager
Bot Creator
Bot Runner
answer is:
Automation Co-Pilot User
14.The benefits of using Automation Co-Pilot Desktop include which of the following?
Allows you to automate contact center workflows
Provides a user-friendly interface for agents to collaborate with bots
Bridges various systems
Prevents agents flipping between systems
All of these are benefits of Automation Co-Pilot Desktop
answer is:
All of these are benefits of Automation Co-Pilot Desktop
15.Which of the following users creates the necessary bots, forms, and processes that are checked into the public folder?
Automation Co-Pilot User
Bot Creator User
Automation Co-Pilot Administrator
Bot Runner User
answer is:
Bot Creator User
16.Which of the following privileges should be assigned to the Automation Co-Pilot Administrator using the Manage Devices role? Select all that apply.
Run my bots
View & manage All device(s)
Create device pools
View my bots
answers are:
View & manage All device(s)
Create device pools
17.Which of the following steps does not belong in creating an automation using Automation Co-Pilot Desktop?
Create forms with text boxes, labels, and buttons as required.
Set rules for teams as needed.
Create the bot(s) required to automate the overall process and form(s).
Configure Trigger Loop and Trigger Loop: Handle actions where needed.
answer is:
Set rules for teams as needed.
18.Which of the roles or users below is used to deploy bots on remote devices?
Automation Co-Pilot Administrator
Bot Creator
Bot Runner User
Automation Co-Pilot User
answer is:
Automation Co-Pilot Administrator
19.Which of the following is an important step in ensuring unattended bots that are triggered by Automation Co-Pilot processes run successfully?
Users and roles are created by the administrator for various personas.
A connection is established between the Control Room and Automation Co-Pilot Web via the Scheduler User.
Teams are created and users are added, then the teams are assigned to processes.
Users create requests for shared and private teams.
answer is:
A connection is established between the Control Room and Automation Co-Pilot Web via the Scheduler User.
20.Which of the following tab alerts about the pending tasks and automation status in the local automation widget within the application?
Automation tab
My Tasks tab
Edit Task tab
Notification tab
answer is:
My Tasks tab
21.The Check-In Role needs which types of access selected on the BOTS tab for Bots and the Bot Store folders? Select all that apply.
Run
Delete from repository
Check in
Check out
Select all
answer is:
Check in and Check out
22.Which of the steps below are also key components in creating an automation process using Automation Co-Pilot Desktop? Select all that apply.
Configure Interactive Forms: Display actions
Setup Automation Co-Pilot Scheduler user
Configure Trigger Loop and Trigger Loop: Handle actions where needed
Configure scheduler for a process
Configure necessary Task Bot: Run actions
answers are:
Configure Interactive Forms: Display actions
Configure Trigger Loop and Trigger Loop: Handle actions where needed
Configure necessary Task Bot: Run actions
24.Automation Co-Pilot widgets are composed from _____ inline frame that the user can configure and access in the supported web browsers.
Java
Python
HTML
PHP
answer is:
HTML
25.Checking in a process along with its dependencies enables you to ___ the process and dependencies from one environment (such as DEV or QA), then ___ them into a different environment (like production). Which pair of words below best fits the corresponding blanks in this statement?
create / save
export / import
import / export
save / create
answer is:
export / import
26.Which of the following provides an intuitive portal that is accessible from web browsers and mobile devices?
Automation Co-Pilot on web
Automation Co-Pilot on Desktop
Embedded Automation Co-Pilot
Automation Co-Pilot on a specified application
answer is:
Automation Co-Pilot on web
27.Which of the following are key components of Automation Co-Pilot Desktop? Select all that apply.
Interactive forms
Bots
Process Schedulers
Triggers
Automation Co-Pilot User Licenses
answers are:
Interactive forms
Bots
Triggers
28.Pick out the non-scheduler option from the following.
Team scheduler
Scheduler assigned for the process on the Deployment tab
Global/default scheduler
Bot scheduler
answer is:
Bot scheduler
29.Which of the following individuals checks in processes and their dependencies?
Bot Creator
Automation Co-Pilot Scheduler User
Automation Co-Pilot Process Scheduler
Automation Co-Pilot Manager
answer is:
Bot Creator
30.Who has the privilege to manage users and the related tasks such as creating teams and assigning members to the team?
Automation Co-Pilot Administrator
Automation Co-Pilot User
Automation Co-Pilot Manager
Bot Creator
answer is:
Automation Co-Pilot Administrator
Which of the statements below are true of the Process Editor? Select all that apply.
Configures when a bot should execute
Branches based on user input
Runs remote bots unattended
Displays correct data back to users
Exchanges data across multiple teams
Shares requests with all team members and owners
answers are:
Configures when a bot should execute
Branches based on user input
Displays correct data back to users
Automation anywhere Co-Pilot Assessment(Q&Ans)
What Is Cursor AI and What Can It Do?
Cursor AI is an AI-powered code editor designed to make software development easier. As a fork of Visual Studio Code (VS Code), it retains the user-friendly interface and extensive ecosystem of VS Code, making it easier for developers already familiar with the platform to transition.
Cursor AI integrates advanced AI capabilities through OpenAI’s ChatGPT and Claude. This integration allows Cursor AI to offer intelligent code suggestions, automated error detection, and dynamic code optimization.
Key autocompletion features
Cursor offers key autocompletion and predictive code features:
- Autocomplete and code prediction: Cursor provides autocomplete functionality that predicts multi-line edits and adjusts based on recent changes.
- Code generation: Familiar with recent changes, Cursor predicts what we want to do next and suggests code accordingly.
- Multi-line edits: It can suggest edits that span multiple lines.
- Smart rewrites: The editor can automatically correct and improve our code, even if we type carelessly.
- Cursor prediction: It predicts the next cursor position, allowing seamless navigation through the code.
Chat features
Cursor also integrates advanced chat features to facilitate better interaction:
- Codebase answers: Query Cursor about the codebase, and it will search through the files to provide relevant answers.
- Code reference: Reference specific blocks of code or files, integrating them into the context of our queries.
- Image support: Drag images into the chat or use buttons to add visual context.
- Web search: Get the latest information from the internet directly into code queries.
- Instant apply: Implement code suggestions from the chat directly into the codebase with a click of a button.
- Documentation integration: Reference popular libraries and add our own documentation for quick access.
For a comprehensive list of features, for example, check Cursor’s feature page.
How to Install Cursor AI
Cursor AI provides an installation file for Linux, Windows, and MacOS that can be downloaded for free on their website.

To install it on Windows and MacOS, we download it from their home page and install the download file as we’d install any other program.
In Linux, it comes as an AppImage file. Before executing it, we need to make it executable using:
chmod a+x cursor-0.40.3x86_64.AppImage
Then, we can execute it with:
./cursor-0.40.3x86_64.AppImage
We may need to replace the version 0.40.3x86_64 in the above commands depending on which version was downloaded. For more instructions on how to install app image files, check out their website.
After installing, we’re prompted with the following configuration screen:
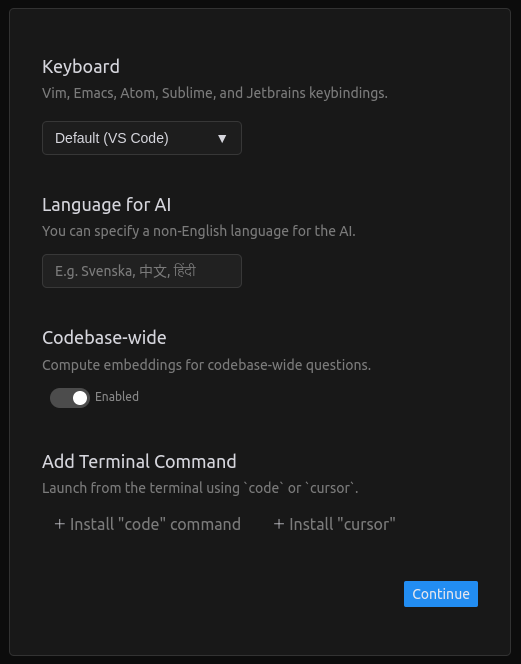
- Keyboard: This option lets us configure the keyboard shortcuts. By default, it uses the VS Code shortcuts, which I recommend unless you are familiar with another code editor on the list.
- Language for AI: Here, we have the option of using a non-English language to interact with the AI.
- Codebase-wide: Enabling this option allows the AI to understand the context of the entire codebase.
- Add terminal command: If installed, these allow the Cursor AI editor to run from the terminal.
How to Use Cursor AI: 10 Use Cases
Throughout this guide, we’ll provide the MacOS shortcuts with the Cmd ⌘ key. The shortcuts are the same if you use Cursor on Windows or Linux, except the Ctrl key is used instead.
Inline code generation
We use the Cmd+K shortcut to open the inline code generator. This opens a small prompt window where we insert a prompt to generate code:

To generate code, we type a prompt and then click the generate button:

This will generate the code, and we add it to our project by clicking the accept button:
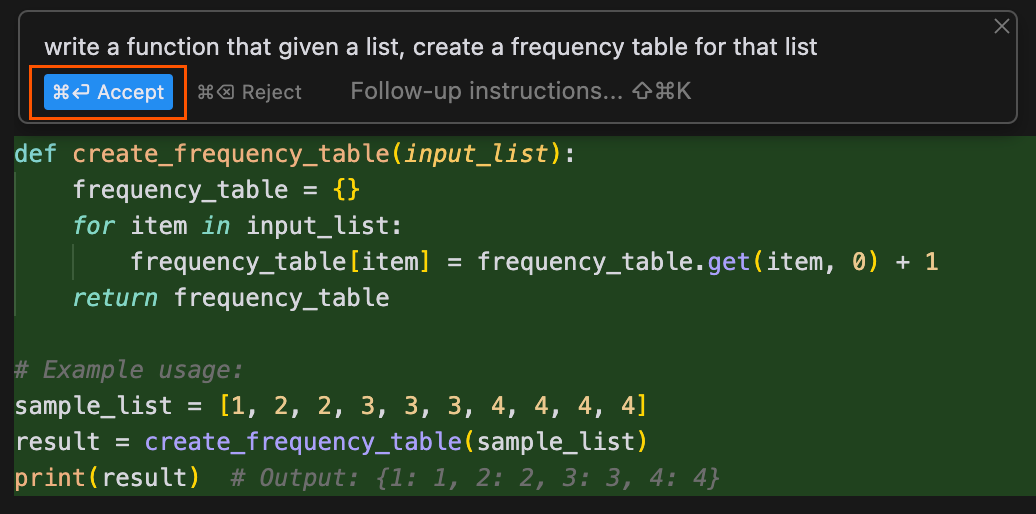
In this case, we used the cloude-3.5-sonnet model. We can select another model using the model dropdown selector:

Interact with existing code
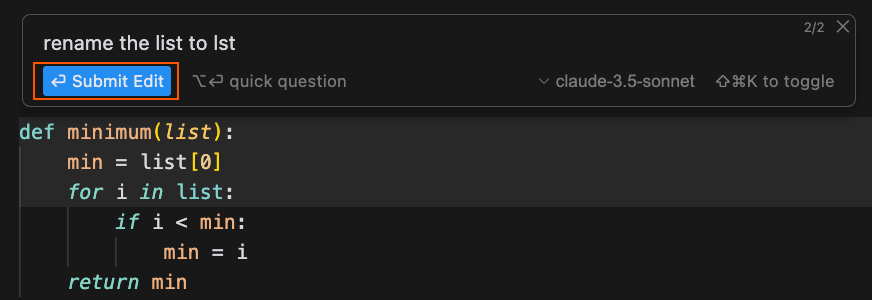
We can also use the inline chat to interact with existing code by selecting the relevant code before using the Cmd+K shortcut. This can be used to make changes to the code, such as refactoring, or to ask questions about the code. After typing the prompt, we click on the Submit Edit button to get the modifications:
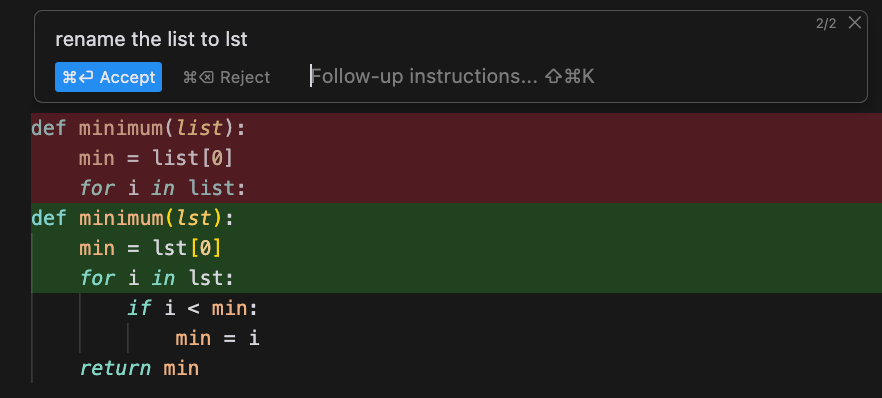
Code changes in the Cursor are presented as a diff. The red lines represent lines that will be deleted by the change, while the green ones represent the new changes that will be added:
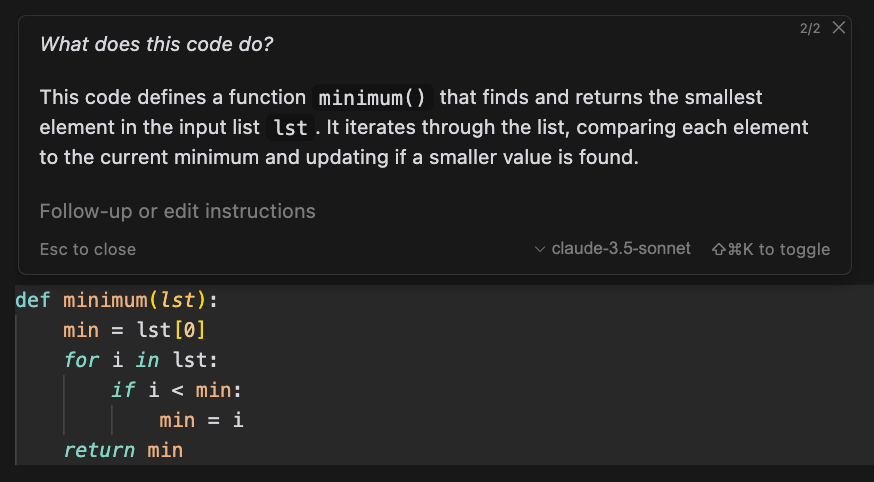
Asking questions about existing code
In the same way, we can ask questions about a piece of code by selecting it and using the Cmd+K shortcut. In the case of a question, we click the quick question button to submit the prompt:
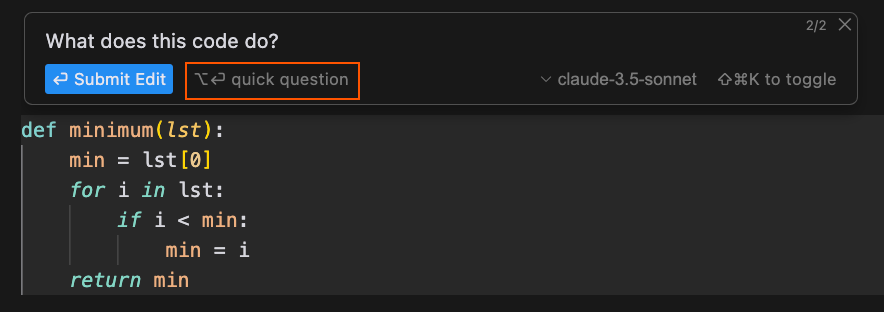
After submitting the question, the system will generate the answer and display it in the following manner:
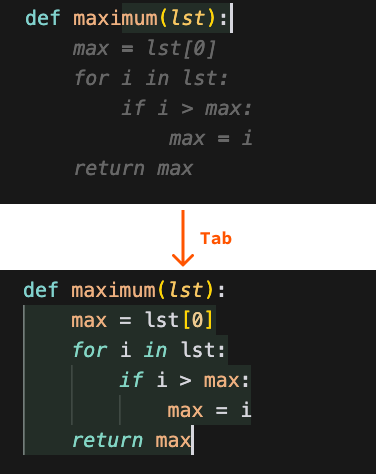
Autocompletion with tab
While writing code, Cursor will suggest code completions generated using AI. Similar to traditional code completion, we can use the Tab key to incorporate these suggestions into our code.
For example, let's say we start implementing a function named maximum(). Cursor will recognize our intent and suggest an appropriate implementation. By pressing Tab, we can add the suggested code:
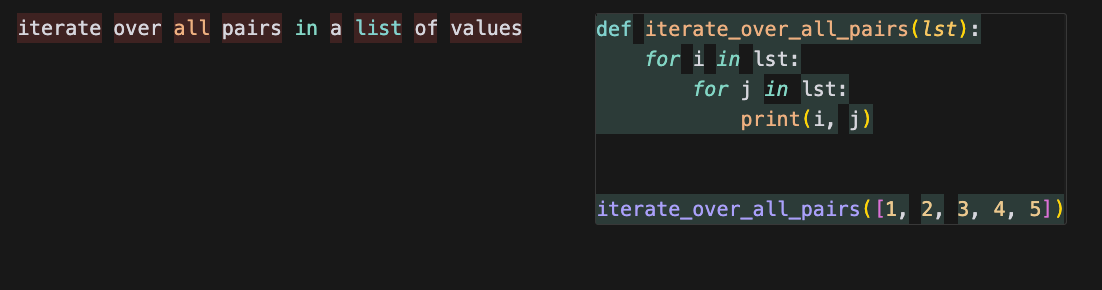
Autocomplete also works with code written in natural language. For example, if we want to create a double for loop to iterate over all pairs in a list, we can simply describe this in plain text. Cursor will then provide the corresponding autocomplete suggestion, which can be integrated by pressing the Tab key:
Chat interface overview
To open the chat window, use the Cmd+L shortcut. The chat window is more versatile than the inline generator, as it allows us to not only generate code but also ask questions. Here’s an overview of the chat interface:
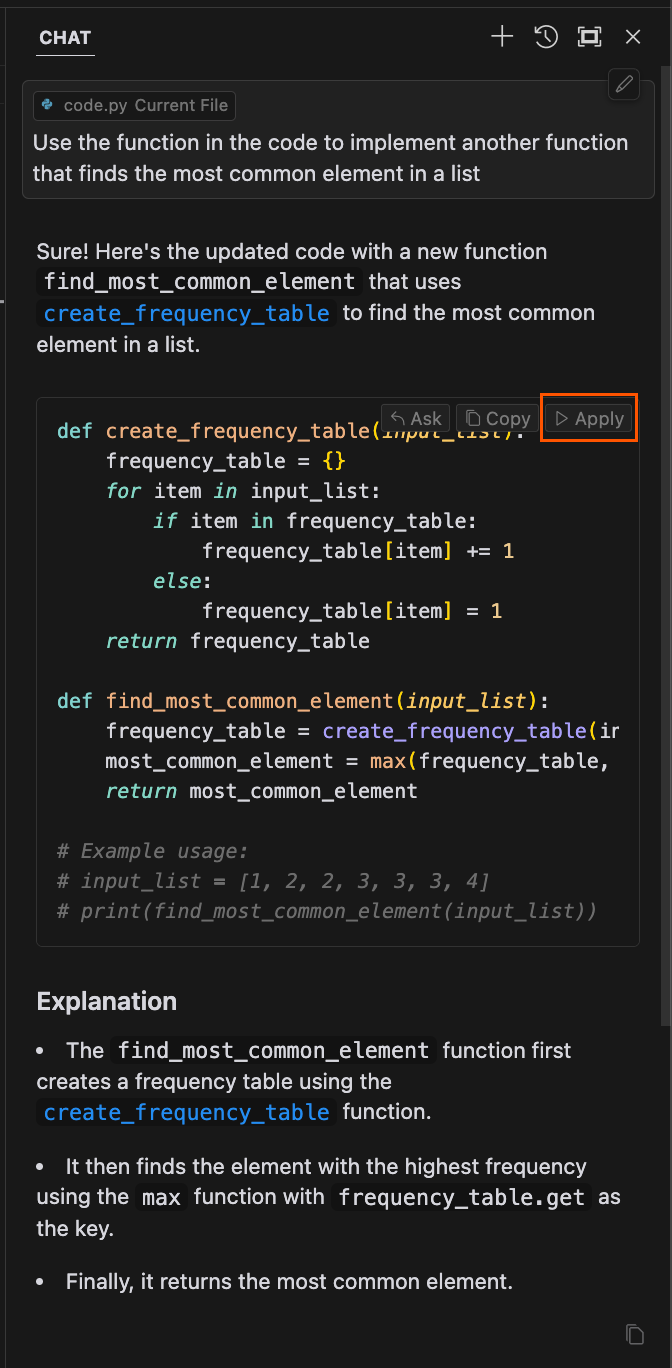
Code generation with chat
Similarly to generating with the inline chat, we can also generate code using the chat feature. The code generated in the chat can be integrated into the project by clicking the Apply button at the top right corner of the code window.
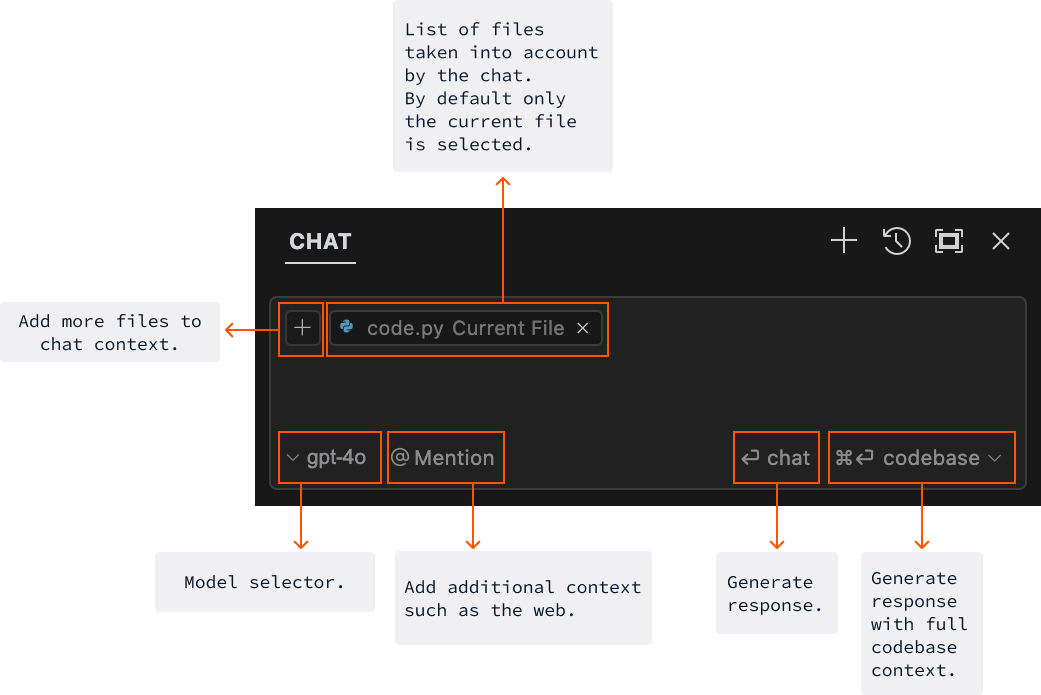
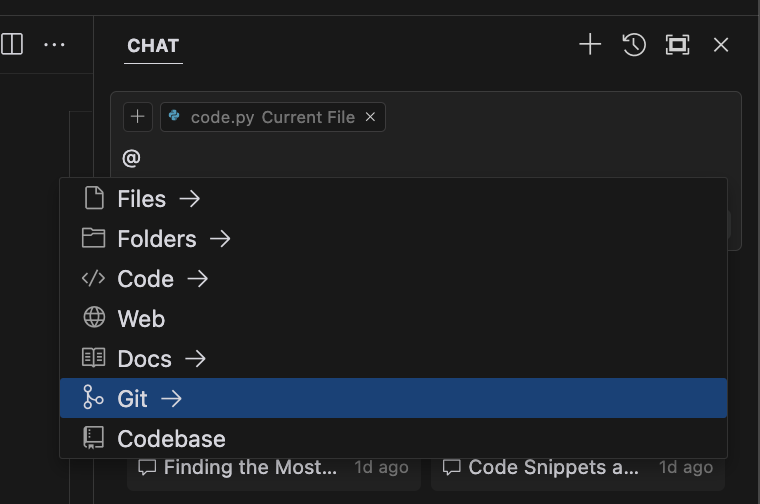
Enhancing query context with @
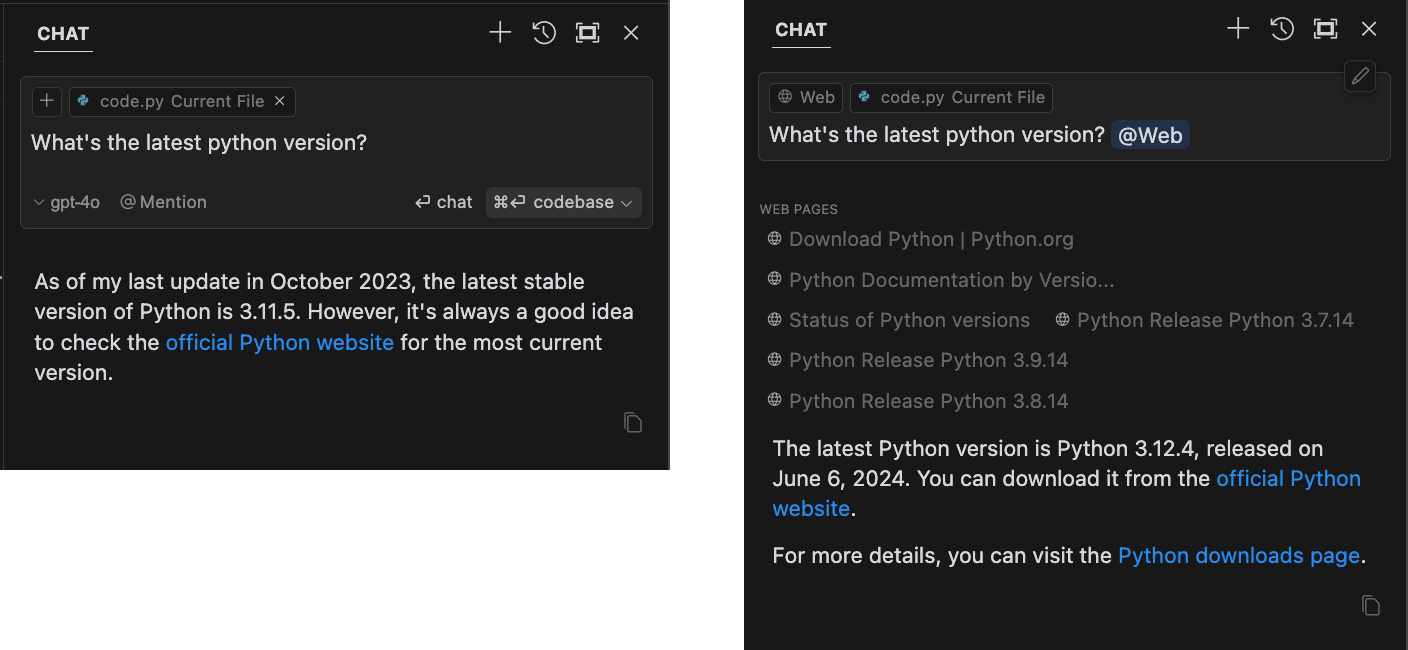
Perhaps the most important feature of the chat window is the @ Mention option. This option enables us to provide more data for the AI to generate the response. This ranges from simple files and folders to web searches or giving the AI access to a GitHub repository.
For example, we can use @Web to allow the AI to search the web for the answer.
Keep in mind that in some cases it might be problematic to share the whole code base or a private GitHub repository with the AI. We should be mindful of what we share with the AI and avoid sharing sensitive or private data.
Global code base questions
One of the features that I find the most useful when working on bigger projects is the ability to quickly find a piece of code by asking a question with the full codebase as scope. Recently, I wanted to locate a function in a project that calculates the navigation direction in an app. With Cursor, I could very simply locate it by describing what the function does:
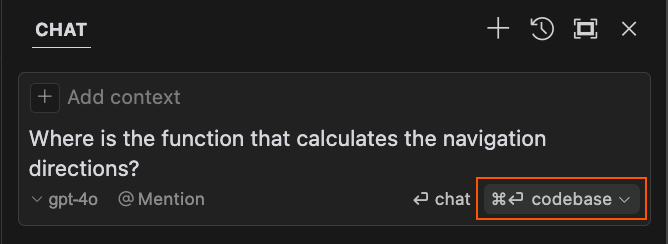
Note that we use the codebase option in this case. Although Cursor didn’t display the actual code for some reason, clicking the code box still opened the correct file and scrolled to the function I was looking for:
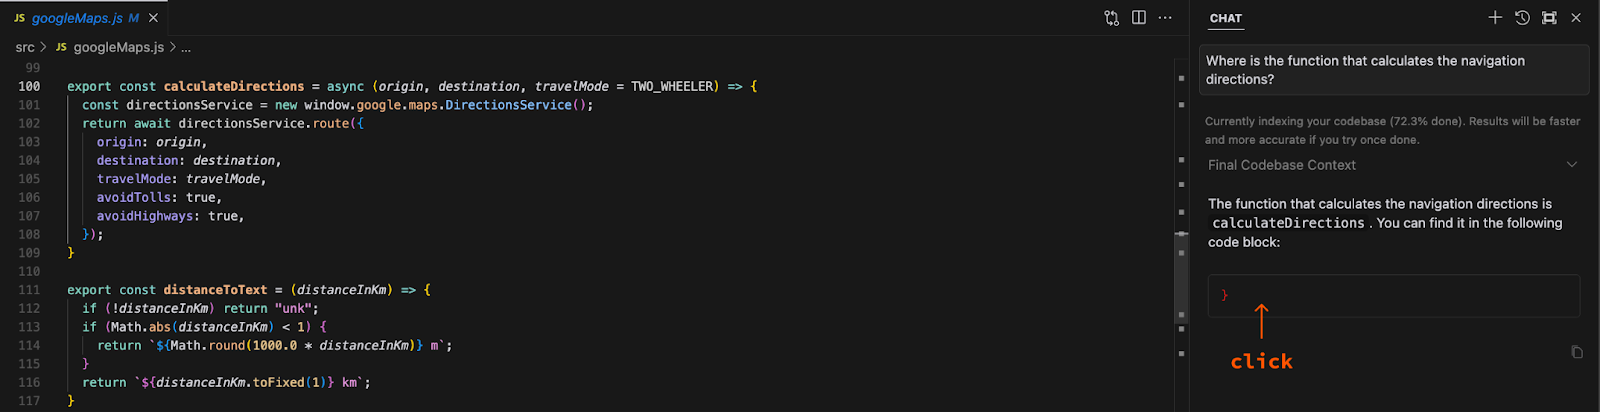
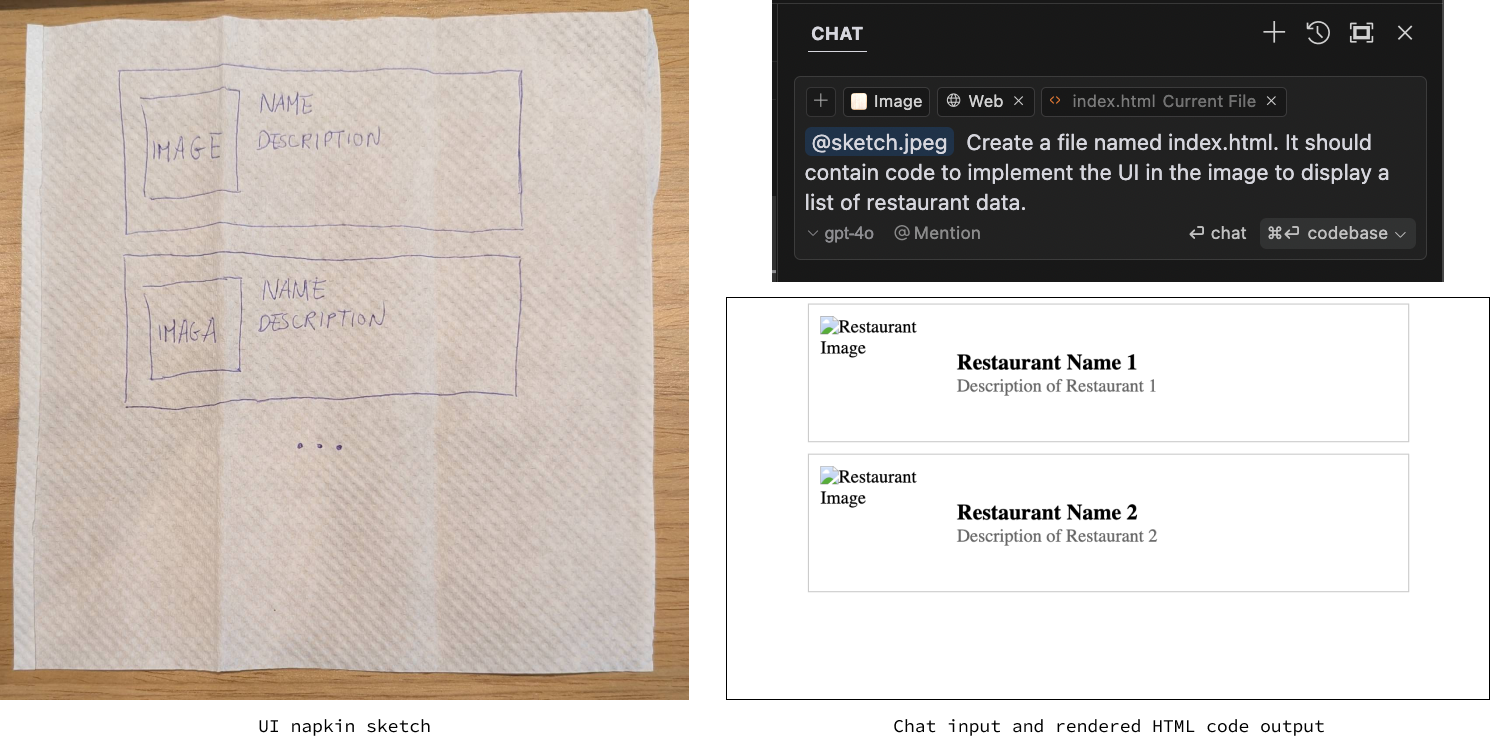
Image support
The Cursor chat also supports image inputs. For example, we could sketch a UI design for a website and ask it to generate the HTML and CSS code for it. To add an image, we can drag and drop it into the chat window.
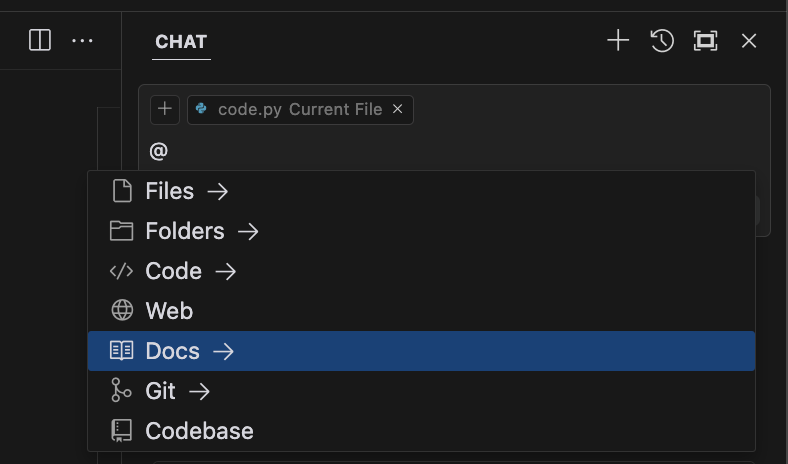
Adding documentation
A very useful feature of Cursor AI is the ability to add documentation references. This is especially useful for lesser-known or private libraries whose documentation might not have been used in the AI training process.
To add a documentation entry, we use the @ symbol and then select Docs from the dropdown menu:
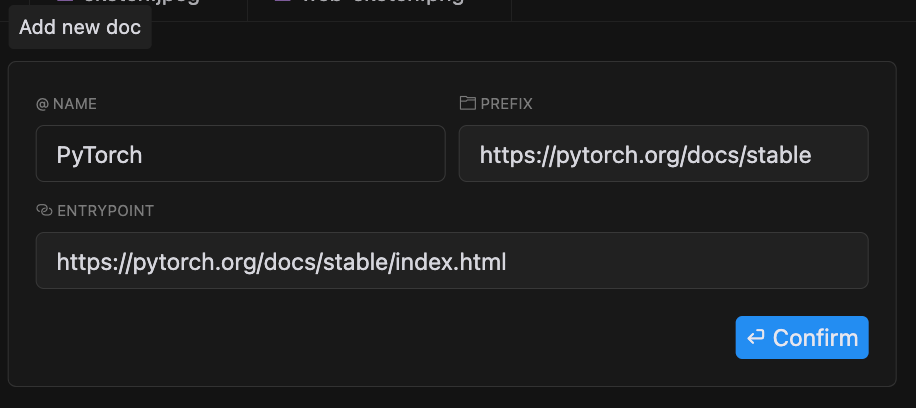
This will open a window requesting a URL for the documentation. Let’s add the PyTorch documentation as an example:

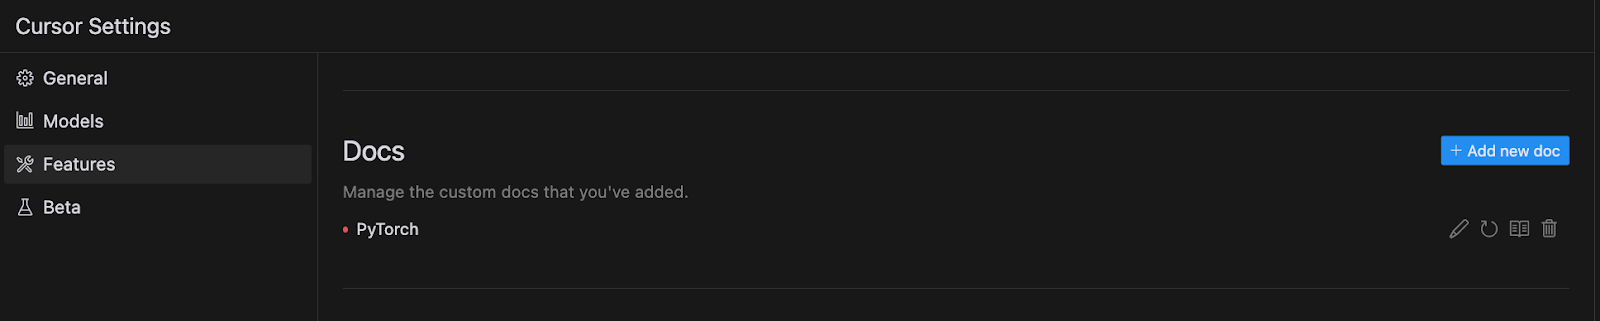
After inserting the URL, we can give the documentation entry a name. In this case, we use PyTorch. We can then use this name to refer to this documentation in the chat prompt using @PyTorch.
Documentation references can also be managed in the Features tab from the Cursor settings:
Cursor AI: Additional Features and Benefits
Language support
The examples we’ve shown in this article were in Python, HTML, and CSS. But Cursor is not built with any specific language support in mind. Because its code generation is based on general-purpose LLMs, Cursor can generate code in any programming language. It will use the file extension to guess what language should be used.
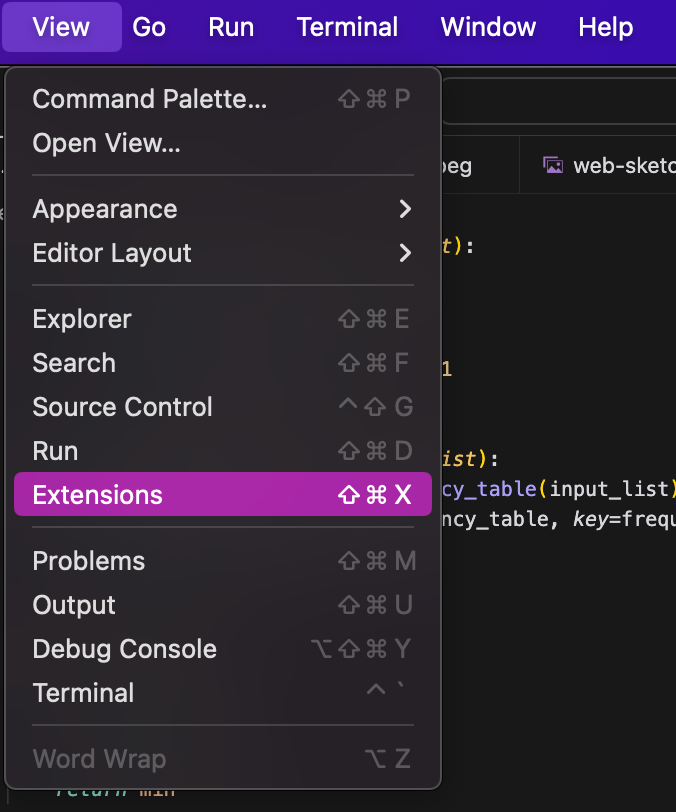
Extensions
Because Cursor is built on top of VS Code, it inherits from its rich extension ecosystem. We can access these in the View menu.
To set up Cursor to work with Python, I recommended the VSCode Python setup tutorial, as the same features should be available on both VSCode and Cursor.
Collaboration with others
Using collaborative tools such as Git with Cursor is similar to using them with any code editor. These tools are not dependent on how the code was written. There are extensions specifically designed to assist with Git.
Remember that Cursor’s chat allows you to use Git repositories within context using the @ operator. Be mindful that this should be used with caution if the repository contains private data.
Setting custom AI rules
Cursor allows us to guide the AI using specific rules. These are accessible under the general settings menu:

These rules can modify the AI's behavior without needing to prompt it repeatedly. For example, we can ensure the AI always uses type hints in Python by adding a rule such as "Always use type hints in Python function definitions."
Custom AI models
Another interesting feature of Cursor is the ability to add other AI models. This option can be found under the Models settings:
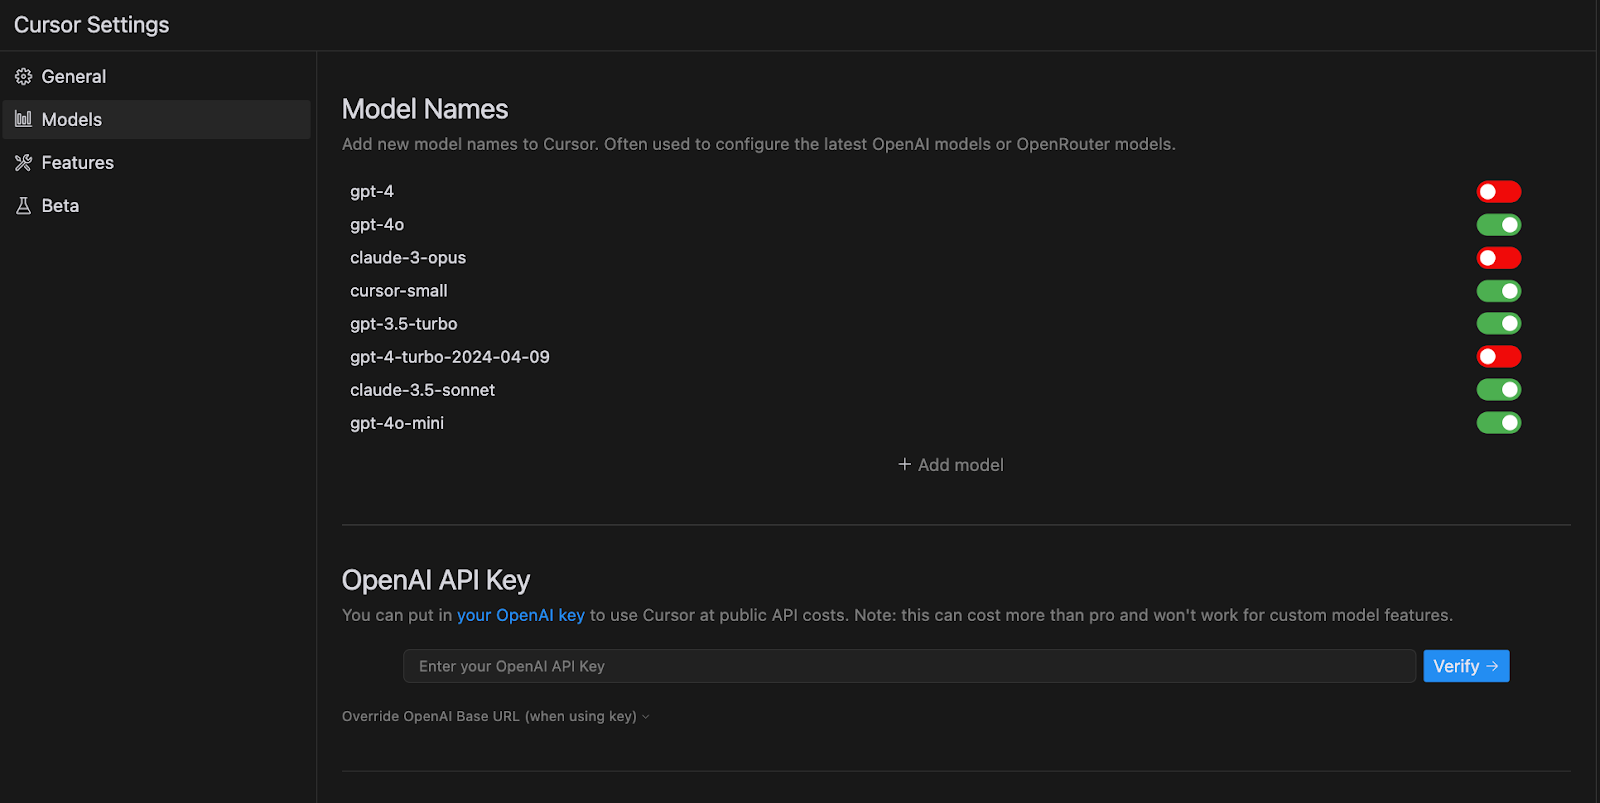
Here we can add new models. These model settings also make it possible to add our API keys if we want.
Cursor AI vs GitHub Copilot
Cursor AI and GitHub Copilot are both AI-powered code assistants, each offering unique features.
Cursor AI is built on VSCode and functions as a standalone editor. It integrates closely with the coding environment to automate tasks and provide intuitive code suggestions, which helps streamline code writing and refactoring. It is particularly suited for developers who prefer a deep integration with a familiar IDE.
GitHub Copilot, developed by GitHub and OpenAI, integrates with various popular code editors like Visual Studio Code. It provides context-aware code suggestions based on the user’s coding style and project context. GitHub Copilot excels at predicting subsequent lines of code and supports a wide range of programming languages and frameworks.
From an integration perspective, Cursor AI offers significant customization within its standalone VSCode-based environment, potentially enhancing workflow for some users. In contrast, GitHub Copilot is noted for its easy setup and integration with widely-used IDEs, which facilitates adoption for many developers.
Both tools provide real-time code suggestions and support for multiple languages and frameworks. Cursor AI may be advantageous for specialized tasks due to its deep integration, while GitHub Copilot’s extensive IDE support and straightforward setup make it accessible to a broader audience.
Ultimately, the choice between Cursor AI and GitHub Copilot may depend on factors like customization needs, integration preferences, and budget. Both tools aim to enhance coding efficiency in different ways.